Category: Finance

Anything related to finance.

  • Alpha and Beta with Modern C++ Ranges

    This article demonstrates the power of modern C++ in financial analysis context. It is aimed at those already familiar with C++ as it does not define basic programming concepts, however it will demonstrate the use of some new C++20/23 features. If you are a intermediate C++ programmer looking how to apply skills to a real world problem, this should be a great article for you.

    Who needs ranges?

    The new ranges library is amazing for many different reasons; the two most important being safety and maintainability. Using ranges improves safety by removing the possibility of out-of-bound errors and improves maintainability by creating a simple to follow syntax that is composable. Other benefits of ranges compared to traditional looping techniques include the lack of allocations, laziness of ranges, and re usability.

    Example Problem

    Rather than explain the power of ranges with some generic learning example, I wanted to demonstrate the usefulness with something people could actually use. I decided on time series analysis; more specifically calculating the alpha and beta between a stock and an index. If you are unfamiliar with what alpha and beta are, read the next paragraph. If you are already familiar, feel free to skip to the next header.

    Alpha and Beta?

    Alpha and beta are two measures commonly used in stock analysis.

    The beta of a stock to an index is the slope of the best fit line between the returns of the target stock and the index. The beta of a stock can be seen as a proxy for the undiversifiable risk associated with the company. If the target stock has a beta of 1.5, it will be expected to produce returns 1.5x that of the index stock. For example, a 1% increase in the index stock will lead to an expected 1.5% gain in the target stock that has a 1.5 beta.

    Alpha on the other hand is the y-intercept of the best fit line. Alpha represents the return that was earned in excess of what beta predicted over the period. As mentioned previously, beta is a proxy for risk, so earning in excess of what beta predicts is creating superior risk adjusted returns. Therefore, a higher alpha represents a higher return per unit of risk; investors always want a higher alpha.

    Sourcing the data

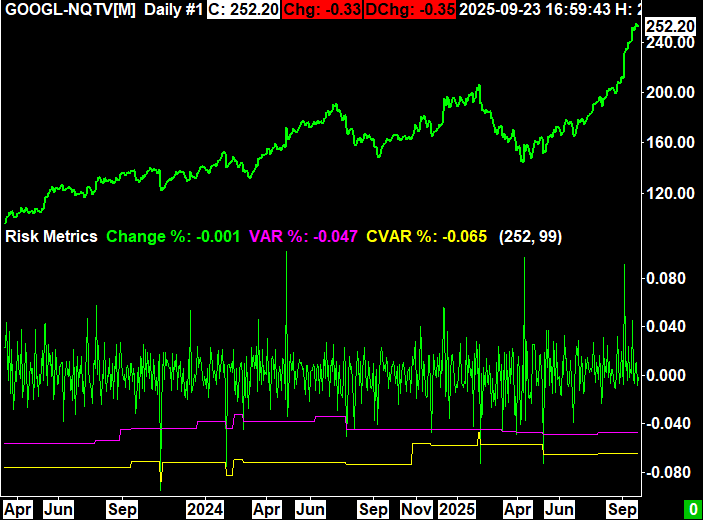
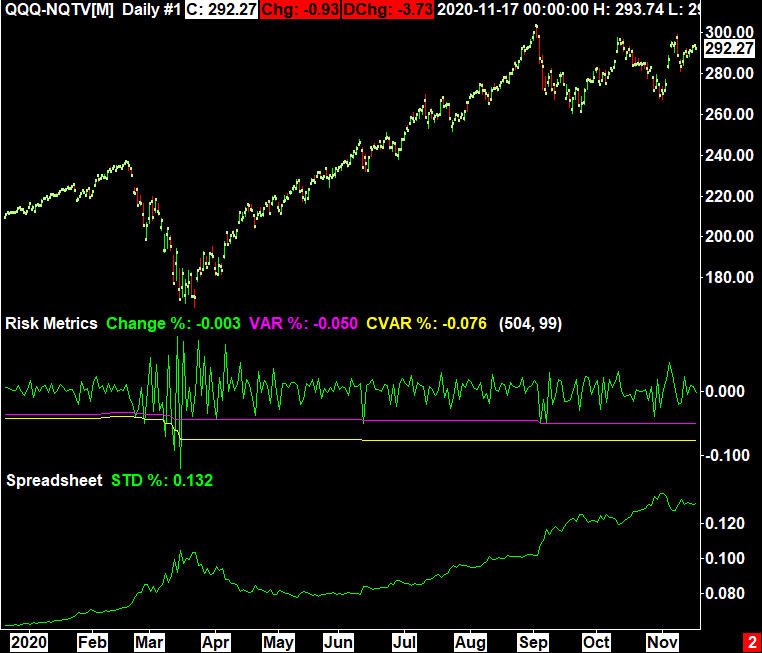
    In order to operate on a dataset, we need to actually get a dataset. My solution to this is using SierraChart to export data in a CSV format. The benefit of using a CSV as an intermediate layer is that anyone reading should be able to substitute the correct format of values from a different data source. The format of SierraChart’s CSV is shown to the right.

    Date, Time, Open, High, Low, Last, Volume, OpenInterest
    2025/1/8, 00:00:00, 588.70, 590.58, 585.20, 589.49, 47304672, 0
    2025/1/10, 00:00:00, 585.88, 585.96, 578.55, 580.49, 73105048, 0

    Parsing the Data

    Following good C++ practice, we need to create a class to represent the bar data to be parsed from the CSV file; we will name that class CBarData. The CBarData constructor will take a line from the CSV of data and parse it into the respective open, high, low, and close member variables.

    class CBarData {
    public:
    	double m_Open{ 0.0 };
    	double m_High{ 0.0 };
    	double m_Low{ 0.0 };
    	double m_Close{ 0.0 };
    
    public:
    	CBarData(const std::string& Line);
    };

    Next, a class is required to represent a time series, we will call this class CTimeSeries. The class will consist of a vector of CBarData representing the underlying bar data. This class can be easily extended to hold different derivations of the base price; in this example we will derive the change from the previous bar’s close. The CTimeSeries class will also now hold a vector of doubles which represent the change from the previous bar close. The CTimeSeries constructor can now handle the calculations of changes easily.

    class CTimeSeries {
    public:
    	std::vector<CBarData> m_BarDataList{};
    	std::vector<double> m_PercentChanges{};
    
    public:
    	CTimeSeries(const std::filesystem::path& Path);
    };

    At this point we now have our raw price data CSV parsed into a valid and complete CTimeSeries.

    Using Ranges

    Now that we have two CTimeSeries we are able to start the beta and alpha calculation process. This is where the new ranges library makes huge changes. We will compose a view over the vector of changes contained in the CTimeSeries. Due to the change calculation being based on the previous bar close, there is no change for the first bar. Ignoring the first x number of elements is exactly what std::views::drop(x) does! Next, we need to select x number of the most recent days, and we can use a combination of std::views::reverse() | std::views::take(x).

    const auto TransformPipeline = std::views::drop(1) | std::views::reverse | std::views::take(NumBars);

    We can refer to this series of 3 steps as a transformation pipeline which can be reused on multiple sets of data. After applying this transformation to the price change vector, we have a properly sanitized view of percent changes over the selected range of changes. We will then pass these ranges of data to the final class; CLinearRegression.

    Beta Calculations

    We create a CLinearRegression class which takes two ranges as inputs for each the x and y ranges of percent changes. Upon construction it will calculate the slope and intercept of the ranges and store the result into member variables. The calculation of beta and alpha also are made much easier with ranges. The use of std::views::zip, std::views::transform, and std::ranges::fold_left make the calculation process intuitive to follow.

    class CLinearRegression {
    public:
    	template<std::ranges::viewable_range rng>
    	CLinearRegression(rng X, rng Y) {
    		if (X.size() != Y.size() || X.size() < 2) {
    			throw std::invalid_argument("Ranges must be of the same size and contain at least two elements.");
    		}
    
    		auto XSquared = std::views::transform(X, [](double x) { return x * x; });
    		auto XYProduct = std::views::zip(X, Y) | std::views::transform([](const auto& pair) { return std::get<0>(pair) * std::get<1>(pair); });
    		auto XSum = std::ranges::fold_left(X, 0.0, std::plus<double>());
    		auto YSum = std::ranges::fold_left(Y, 0.0, std::plus<double>());
    		auto XSquaredSum = std::ranges::fold_left(XSquared, 0.0, std::plus<double>());
    		auto XYProductSum = std::ranges::fold_left(XYProduct, 0.0, std::plus<double>());
    
    		m_Intercept = (YSum * XSquaredSum - XSum * XYProductSum) / (X.size() * XSquaredSum - (XSum * XSum));
    		m_Slope = (X.size() * XYProductSum - XSum * YSum) / (X.size() * XSquaredSum - (XSum * XSum));
    	}
    	const double& GetSlope() const { return m_Slope; }
    	const double& GetIntercept() const { return m_Intercept; }
    
    private:
    	double m_Slope{ 0.0 };
    	double m_Intercept{ 0.0 };
    };

    Final Code

    Putting it all together we create a simple program that takes 3 inputs from the user to run the regression and output the result. The complete code can be found on the following GitHub repository.

    #include "pch.h"
    #include "Classes/CTimeSeries.hpp"
    #include "Classes/CLinearRegression.hpp"
    
    int main(int argc, char* argv[])
    {
    	if (argc < 4) {
    		std::println("Usage: <TargetTicker> <IndexTicker> <NumBars>");
    		return 0;
    	}
    
    	std::string TargetTicker = argv[1];
    	CTimeSeries TargetTimeSeries(std::format("C:\\SierraChart\\Data\\{}-NQTV.dly_BarData.txt", TargetTicker));
    
    	std::string IndexTicker = argv[2];
    	CTimeSeries IndexTimeSeries(std::format("C:\\SierraChart\\Data\\{}-NQTV.dly_BarData.txt", IndexTicker));
    
    	size_t NumBars{ std::stoul(argv[3]) };
    	const auto TransformPipeline = std::views::drop(1) | std::views::reverse | std::views::take(NumBars);
    
    	try {
    		CLinearRegression Regression(IndexTimeSeries.m_PercentChanges | TransformPipeline, TargetTimeSeries.m_PercentChanges | TransformPipeline);
    		std::println("[{0:s}-{1:s}] y={2:.2f}x{3:+.4f}", TargetTicker, IndexTicker, Regression.GetSlope(), Regression.GetIntercept());
    	}
    	catch (const std::invalid_argument& e) {
    		std::println("Error: {}", e.what());
    	}
    
    	return 0;
    }

    Example Usage/Output

    >reg QQQ SPY 250
    [QQQ-SPY] y=1.17x+0.0000
    
    >reg GOOGL QQQ 250
    [GOOGL-QQQ] y=0.91x+0.0015
    
    >reg META QQQ 250
    [META-QQQ] y=1.18x-0.0005
    
    >reg GOOGL META 250
    [GOOGL-META] y=0.37x+0.0021

  • Risk Measures: Value At Risk

    Risk Measures: Value At Risk

    Introduction

    This blog post introduces a new custom study to Sierra Chart which adds two popular risk metrics: value at risk (VaR) and conditional value at risk (CVaR). The study does a historical VaR and CVaR calculation given the length of the look back period and the confidence interval.

    If you are unfamiliar with what VaR or CVaR are, I will briefly describe them in the next section. If you are already familiar what these metrics are, feel free to skip to next section.

    An Introduction to VaR and CVaR

    VaR and CVaR are two common risk measures that help describe the distribution of losses from an asset or portfolio. Both measures require 2 inputs; the look back period (x) and the confidence interval (y).

    “VaR is the loss level we do not expected to be exceeded over the time horizon at the specified confidence interval” – GARP (2022)

    There are multiple different ways to calculate VaR such as historical simulation or monte carlo simulation. Historical simulation is done by sorting previous returns over period x and choosing the yth percentile return for VaR. CVaR is then the average of the remaining realizations that exceed the VaR level.

    Study Settings

    The study comes with a total of 5 sub graphs and 2 inputs.

    Inputs

    • Length (Bars): The look back period in chart bars
    • Confidence Interval (%): The confidence interval to run the analysis with

    Subgraphs

    • Change %: Percent change from today’s last price from yesterday’s last price
    • VAR %: The value at risk shown as a percentage
    • CVAR %: The conditional value at risk shown as a percentage
    • VAR $: The value at risk shown in dollars (VAR% * Last Price)
    • CVAR $: The conditional value at risk shown in dollars (CVAR% * Last Price)

    Interpretation

    VaR and CVaR ultimately exist to represent the risk of the specific asset that is being charted. Therefore, the most elementary interpretation is that the more negative the numbers, the higher the risk you should expect.

    Many investors might choose to look at standard deviation of returns or the price of an asset as the “risk,” but VaR and CVaR are often better representations. Furthermore, if given two identical investments with identical VaR but one has a higher CVaR, the one with the higher CVaR is considered riskier. This is because the larger CVaR means that when losses do exceed the VaR, they are larger in magnitude.

    The image to the right shows the difference between VaR calculations and the standard deviation of returns during the COVID-19 pandemic using a 2 year look back period. VaR is more responsive and gives investors a more logical way to think about risk than simply standard deviation of returns.

    Implementation

    The implementation of a historical VaR analysis is relatively simple and involves 2 main steps. The first step is to accumulate and sort the previous percent changes into an array. The next step is to calculate which item in the array corresponds with the given confidence interval.

    The code block to the right shows the implementation used in the study.

    One traditional feature of VaR that this implementation does not include is interpolation between data points. For example, in traditional VaR if there is a look back period of 150 with 99% confidence, the VaR will be the average between the 2nd and 3rd largest losses. In my implementation, the VaR is rounded to the nearest real occurrence (variable name VARIndex). This will produce minor difference in the calculation compared to interpolation, but these differences do not dramatically impact the interpret-ability or usefulness of the indicator. Furthermore, if you are using a look back period that evenly divides by (1-Confidence Interval), there is not interpolation required and therefore the answer is exact.

    struct RiskMetrics
    {
    	float VAR = 0.0f;
    	float ES = 0.0f;
    };
    
    RiskMetrics GetRiskMetrics(SCStudyGraphRef sc, SCSubgraphRef PercentChanges, int Length, float Percentile)
    {
    	RiskMetrics rm;
    
    	if (Percentile > 100.0f) return rm;
    
    	std::vector<float> Changes;
    	Changes.reserve(Length);
    
    	for (int i = sc.Index; i > sc.Index - Length; i--)
    		Changes.push_back(PercentChanges[i]);
    
    	std::sort(Changes.begin(), Changes.end());
    
    	if (Percentile == 100.0f)
    	{
    		rm.VAR = Changes[0];
    		rm.ES = Changes[0];
    		return rm;
    	}
    
    	float ItemWidth = 100.0f / static_cast<float>(Changes.size());
    
    	float Intermediate = (100.0f - Percentile) / ItemWidth;
    
    	uint32_t VARIndex = std::round(Intermediate);
    
    	rm.VAR = Changes[VARIndex];
    
    	for(int i = 0; i < VARIndex; i++)
    		rm.ES += Changes[i];
    
    	rm.ES /= static_cast<float>(VARIndex);
    
    	return rm;
    }
  • Algorithmic Trading Basics: Sierra Chart

    Algorithmic Trading Basics: Sierra Chart

    Introduction

    Welcome to my Sierra Chart Automated Trading Basics blog post. This blog post will cover how to submit orders and get position data using Sierra Chart’s ACSIL. This is not meant to serve as a complete tutorial, but rather a nice reference point for beginners. The full documentation for ACSIL can be found here.

    Sierra Chart Settings

    Before getting into the code, there are a few settings within Sierra Chart that need to be enabled to allow for automated trading.

    • Trade >> Auto Trading Enabled – Global
    • Trade >> Auto Trading Enabled – Chart
    • Trade >> Trade Simulation Mode

    Furthermore, there are additional settings that must be changed in order to submit orders to a live exchange. However, I will not cover those here and will leave that as an exercise to the reader. If you don’t want to figure that out, you probably shouldn’t be doing live automated trading. 😅

    Submitting Orders

    Sierra Chart handles orders through a structure they call SCNewOrder. You can populate this order structure with information relating to the order; such as quantity, order type, symbol, and more. For this example, we keep it simple with a single lot market order on the current symbol.

    	s_SCNewOrder OneLotMarket;
    	OneLotMarket.OrderQuantity = 1;
    	OneLotMarket.OrderType = SCT_ORDERTYPE_MARKET;
    	OneLotMarket.Symbol = sc.Symbol;

    Once you have populated your desired SCNewOrder you can pass it to the BuyEntry or SellEntry methods which will execute the trade as a new long or short position respectively. In order to close out of a trade, you pass the SCNewOrder structure to the BuyExit or SellExit methods.

    Checking Position

    Sierra Chart provides a method for retrieving current position data named GetTradePosition. It provides information about the current trade position including trade quantity, symbol, average price, and more. This information can and will be used for trading and risk management logic.

    Trading Logic

    The trading logic for this study is based on RSI and kept exceptionally simple. The study will enter a short position whenever RSI exceeds 80, enter a long when RSI is below 20, and close the trades whenever RSI has crossed 50.

    Code

    The full source code of the study has many more lines than shown in the code block to the right due to setting defaults and naming variables. To keep the code block as readable as possible, I excluded much of the unimportant “filler” lines. Feel free to view the entirety of the source code by downloading a copy using the link below.

    The code block clearly demonstrates how to create a new SCNewOrder, fill the order with information, and then act upon the order depending on other factors.

    SCSFExport scsf_RSITrader(SCStudyGraphRef sc)
    {
    	s_SCNewOrder OneLotMarket;
    	OneLotMarket.OrderQuantity = 1;
    	OneLotMarket.OrderType = SCT_ORDERTYPE_MARKET;
    	OneLotMarket.Symbol = sc.Symbol;
    
    	sc.RSI(sc.BaseDataIn[SC_LAST], RSISubgraph, RSIAvgType, RSILength);
    	auto& CurrentRSI = RSISubgraph[sc.Index];
    
    	s_SCPositionData PositionData;
    	sc.GetTradePosition(PositionData);
    
    	/* If position quantity is non-zero, handle position exit */
    	if (PositionData.PositionQuantity)
    	{
    		if (CurrentRSI > 50 && PositionData.PositionQuantity > 0)
    			sc.BuyExit(OneLotMarket);
    		else if (CurrentRSI < 50 && PositionData.PositionQuantity < 0)
    			sc.SellExit(OneLotMarket);
    
    		return;
    	}
    
    	/* Else, handle new positions */
    	if (CurrentRSI > SellThreshold)
    		sc.SellEntry(OneLotMarket);
    	else if (CurrentRSI < BuyThreshold)
    		sc.BuyEntry(OneLotMarket);
    }

    Final Result

    After building the file into a finished DLL and loading into Sierra Chart, this is what it looks like. The RSI is plotted as a purple solid line, while the buy/sell thresholds are represented as dotted green/red lines.

    Is the strategy any good?

    While this strategy is exceptionally simple, it provides interesting results. I ran a back test of the strategy with default study settings on 5 min NQU25 futures from April 2nd to September 18th. The strategy made 232 trades with an average profit per trade of 3.85 points for a total gain of 893.75 points. The winning percentage was 66.81% and the profit factor was 1.13.

    If you’d like to view the full statistics and trade log, the links to the data are below.

    Thank you for reading. I hope you learned something new.

  • Sierra Chart Study: ATR Percentage

    Sierra Chart Study: ATR Percentage

    Welcome to my first ever blog post. I will keep this one short and simple as a way for me to practice using the WordPress blog system.

    This post will include the source code for a Sierra Chart study which will show the current bar’s range as a percentage of a historical ATR. The length and moving average type of the historical ATR can be chosen through the inputs.

    I personally use this study intra-day as an alert for sudden increases in volatility. This is done by using Sierra Chart’s built in chart drawing alert feature.

    Code

    SCSFExport scsf_ATRPercentage(SCStudyGraphRef sc)
    {
    	auto& ATRSubgraph = sc.Subgraph[0];
    	auto& ATRPercentSubgraph = sc.Subgraph[1];
    	auto& ATRLengthInput = sc.Input[0];
    	auto& ATRTypeInput = sc.Input[1];
    
    	if (sc.SetDefaults)
    	{
    		sc.GraphName = "ATR Percentage";
    
    		sc.AutoLoop = 1;
    
    		ATRLengthInput.Name = "ATR Length";
    		ATRLengthInput.SetInt(14);
    
    		ATRTypeInput.Name = "ATR Type";
    		ATRTypeInput.SetMovAvgType(MOVAVGTYPE_SIMPLE);
    
    		ATRSubgraph.Name = "ATR";
    		ATRSubgraph.DrawStyle = DRAWSTYLE_IGNORE;
    
    		ATRPercentSubgraph.Name = "ATR Percentage";
    		ATRPercentSubgraph.DrawStyle = DRAWSTYLE_LINE;
    	}
    
    	auto Length = sc.Input[0].GetInt();
    	auto MovAvgType = sc.Input[1].GetMovAvgType();
    
    	sc.ATR(sc.BaseData, ATRSubgraph, Length, MovAvgType);
    
    	auto& CurrentBarHigh = sc.BaseData[SC_HIGH][sc.Index];
    	auto& CurrentBarLow = sc.BaseData[SC_LOW][sc.Index];
    	auto CurrentBarRange = CurrentBarHigh - CurrentBarLow;
    
    	ATRPercentSubgraph[sc.Index] = CurrentBarRange / ATRSubgraph[sc.Index];
    }